Wednesday, December 28, 2011

2011 Projects Top 10

I can't believe the year is ending. I feel like each year is going by faster and faster (don't tell me it's that I am getting old, I blame the busy schedule...).

I went through my posts from this year and picked my favorite top 10 projects to share with you. Which one was your favorite? Is there anything you want to see at Tea Rose Home in year 2012? Tell me what you think. :)

No. 10 Scrap book embellishment rings

This is such an easy project, but I love the uniqueness of these rings!


No.9 Anthoro Inspired Necklace

I used various buttons, beads and such to create this one of a kind necklace. statement necklace such as this is great to dress up a simple top.


No.8 Quilt for raising money for Japanese earthquake victims

After the terrible earthquake in Japan, I witnessed so many wonderful people come together to do something for the people in Japan. I created this quilt to donate for a fund raiser at a huge garage sale organized by Japanese people who live around here. They were able to raise about five thousand dollars in one day!


No.7 Same Quilts, Different Personalities Quilts

I finished these quilt tops for my boys YEARS ago, and this year I finally finished them! It is such a good feeling to complete things like these. The great part is that the boys love the quilts and they both use them every single day. :)


No.6 Five Kitchen Towels Dress

When I found those kitchen towels I had a flash of an idea in my head and I had to give it a try. It is such an easy project, light and absorbent fabric is perfect for the summer time.


No.5 Neapolitan Dress

I wanted to create a simple dress for a girl. With babushka and the belt, there are several ways to dress up this dress.


No.4 The Very Hungry Caterpillar Felt Food

I get asked all the time if I sell these on Etsy... I only made them for my little girl, and they are not for sale, but perhaps, I might come up with a tutorial in the future?


No.3 JCrew Inspired Dress

I love this dress, it turned out pretty close to what I planned. I was inspired by a dress by JCrew, but put my own spin on it.


No.2 She Carries Flowers

Near the end of summer, I was making a bunch of yo-yo's and fabric folded flowers for this project. I just had to get busy to give real shape to an idea I had in my head. I use the bag all the time, it is just the perfect size to carry it all, not to mention, all the flowers make me smile.


Can you guess what my most favorite project is? (drum roll.....)
No.1 is She Wears Flowers

Have you guessed it? Is this also your favorite? I must say, I just LOVE how this cardigan turned out. Every time I wear it, I don't mind the cold weather so much. It is simply a very cheerful feminine top.


I hope you have enjoyed visiting me this year, and continue to do so in the coming year. Because of all the procedures I'm going to have, the frequency of my tutorials might slow down. My wish is that I will be able to create things that are true to my style, yet learn something new and reflect that in whatever I make.

I hope you all to have a happy new year... Be happy everyone! :)

Tuesday, December 27, 2011

A Christmas Package from Japan


Just before Christmas, I received a package from my mom in Japan. Among many goodies for the whole family, there were two wrapped gifts just for me... do you want to guess what they were?

Ta-da!(followed by a scream of joy)


If you have been reading my blog for a while, you know that I have a thing for fabrics from Liberty of London. There is a fabric store in the area I used to live and they sell fabrics by "Liberty Japan". There are original designs from Liberty of London, but printed in Japan. Oh how I LOVED going to that store... While my friends spent their money on clothing or for clubbing, I spend mine on sewing books and fabrics after payday. I was one of their loyal customers. :)

Here are some of my favorites...


Most of them are 50 cm long. Right now I am just in the looking and touching stage and haven't decided what I am going to do with them. They are such precious pieces of fabrics, I have to be sure before I cut them. I had this greedy thought that I wish I had more yardage for the ones that I absolutely LOVE, so I could make some dresses or tops for this summer. (bad Sachiko, bad)

I am going to have another procedure on the 29th, so while I am recovering I will have plenty of time to think of what to do with those fabrics. When I called my mom to thank her for the package, she started crying and apologizing for not being here to help me after the procedures. I have to say it was totally her fault that I started crying too, I guess it is contagious even over the phone...

I am so grateful that she is my mother, and it is such a nice feeling to know that I have someone that loves me and cares about me even though we are thousands of miles apart from each other.

Thanks mom for the Christmas packages and so much more.

Wednesday, December 21, 2011

Tutorial/ Pleated Pretty Shirt with Buttons


This t-shirt makeover is inspired by the Nickleby bib top by J Crew and I fell in love with the shirt several months ago.

I have been wanting something different rather than ruffle shirt to wear underneath a cardigan, this was a perfect design for that! I finished making this a while ago. I enjoyed wearing it and took some pictures. I am sharing a quick tutorial with you today, enjoy!

* You will need


T-shirt

Handkerchief with lace trims (20"x 20"). (Well, that's what I had at hand. You can use whatever fabric and lace for this project, but the thinner the fabric is the better)

Matching thread, various buttons

* How to

1. Mark the middle of the shirt.


2. Cut the handkerchief. I saved the lace trim from the edges to use later. If you are using regular fabric, cut the fabric to 8 1/2"x 18 1/2" to make pleats. If you are working with a bigger t-shirt, you might want more fabric to make more pleats.

3. I wasn't really thinking when I was working on this project, so I don't have a detailed step by step on how to make pleats. Basically, just fold the fabric and sew along the line, repeat then you will have pleats. I didn't even measure where to fold the fabric, I totally eyeballed it... sorry, I will have better instructions when I work on another pleated project in the future... (in the meantime, you can find a bunch of tutorials if you google it).

After you finish making the pleats, lay the pleated piece by the neckline (make sure the center matches), and cut off the excess to make a curve line.

4. Sew the edge of the lace with largest stitch setting on your sewing machine. Pull a thread to gather the lace to make ruffles. Pin it with the pleated fabric in the center of the t-shirt. Sew.


5. Add trim to the seam of the pleated fabric and lace, and neckline.


6. I decided to use different buttons to give something interesting to the shirt instead of matching buttons.


I wore this shirt several times already since I finished making it. In my opinion, it is slightly less feminine compared to the ruffle shirt, but I love this one too.


Monday, December 19, 2011

Sachiko Lately


It has been almost two weeks since the last procedure. Usually I am up and about around the house in 3-4 days and in a week or so I can handle the regular routine. Also the pain is something I can manage, not too bad.

This time it was a whole new experience. The formula the doctors used is different. With the new formula, the area that sclerosed will be permanent. My body may still form new veins, but I don't have to worry about old ones reopening. To me that is amazing news, and again, it is a testament for being hopeful paying off! Who knows, they might find a cure for me someday.

But you know what... this time the recovery is so much more painful and taking a LOT longer. The first three nights I couldn't sleep very well; I would just doze off and wake up with shocking pain. I have a bunch of DVD of Japanese TV shows I didn't have time to watch for a long time, so I just laid on the bed and watched them.

I just have to keep in mind that this treatment is permanent and take them one treatment at a time. It will be worth it right?

They found a bunch of areas that they can treat. So over the next several months, my life will be all about the procedure and recovery. Between those times, if I have some days that are good, I can use the time for my family and creating & blogging... you know, priorities.

I hope you guys will understand when you come back and my posts are little "blah".

Today, for the first time in 12 days I held the needle to start quilting the quilt above. I used a charm pack a got at the bloggers meet up in May to make this quilt. I pieced the top and basted it before the procedure, I am so glad that I have something to work on right now! Ah....I love it.
I love quilting by hand, and especially at times like this, it is so therapeutic. I am so grateful that I found something I LOVE at an early age.

Big thanks to family and friends for your lovely notes, meals and helping hands. I deeply appreciate you. Although I am enjoying the quilting, watching TV and reading books, this is the type of vacation with pain, so I don't think you should envy me. :)

This is my latest, but don't worry I am doing ok. I am keeping my wit and humor, and my spirit is high. Love you all, and I hope you are enjoying the Christmas season! Talk to you soon. :)

Saturday, December 17, 2011

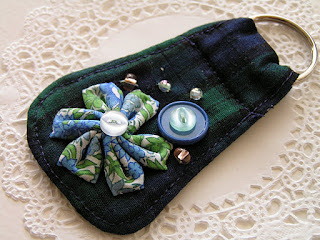
Tutorial~ She Carries Flowers (key holder)

I thought I posted this tutorial on my blog, but now I don't remember if I did or not. I have been getting requests for a tutorial from the people who saw the pictures of the finished key holder on line (probably Sew Mama Sew or Pinterest) but couldn't find the tutorial for it. So, I am sorry if you are tired of seeing this, but if you have been trying to find the tutorial, here you go. :)

I will also list this on my side bar along with my other tutorials.

I have been obsessed with folded fabric flowers and wool flowers lately. I have created a bag and refashioned one of my old cardigans by using the flowers and I LOVE how they turned out.

The love of those flowers didn't end there and I still have a bunch of ideas for them. I am sharing a tutorial for a key holder today and of course it is decorated by fabric folded flower... The key holder is easy to make and you can make a whole bunch of them inexpensively. It is a perfect stocking stuffer, or for a gift exchange with the girlfriends you hang out with.

I hope you will enjoy the tutorial!


{You will need} --- For one key holder


1 --- 2 1/2" x 6 1/2" fabric
1 --- 2 1/2" x 2 1/2" fusible fleece
Matching thread
1 Ring

6 --- 1 1/4" x 1 1/4" fabric squares for making a flower
Buttons and beads to decorate

{How to}

1. Fuse the fusible fleece to the fabric. Follow the instructions that came with the fusible fleece. Fold the fabric at the edge of the fusible fleece. Measure and mark the fleece, according to the picture. If you are making more than one, it will be quicker to make a pattern with a piece of paper and trace it.


2. Sew inside of the line, using 1/4" seam. Cut off the excess and cut small triangles around the corners for a nicer finish.


3. Turn the fabric inside out. It is easier to use scissors or a chopstick to push the fabric out. Fold the top in thirds, and press the whole thing with an iron. Stitch around the edge with 1/8" seam.


4. Fold 1/4" from the top, and put a ring on the fabric and fold the fabric over the ring and sew the ring into the key holder.


5. Sew fabric folded flower, beads, and buttons to the key holder. I did it so that the stitches are not showing on the other side. You can see what I did to make the flower here .


I enjoyed coming up with combinations of fabrics, buttons and beads. It is so funny that a slight change can give each key holder a whole new look.


I hope you have enjoyed my tutorial today. Happy sewing!

Wednesday, December 14, 2011

UGG Australia


All you creative minds, exciting news! UGG Australia wants me to spread the word for a design contest for a cause.

This December, UGG Australia is giving fans a chance to design their own boots (to be sold in store) all for a good cause. Formerly celeb focused, the DIY contest allows users to (virtually) design their own UGG Australia boots and the winning design will be produced and sold online and in stores across America in 2012. A portion of the proceeds donated to 'The Boys and Girls Clubs of America'. On top of that, the winner receives $5,000, a complimentary pair of their boots and a bag, and tons of global exposure and recognition.

The interactive application will live on the Talenthouse website, the Art & Sole Facebook Tab and is also embeddable to blogs so users can engage with the iframe without leaving that individual blog. To participate, users simply download the template, design their boots, and upload their design! Readers can be a part of the campaign by submitting their creations (now – Dec 26) or by simply vote for designs they love (Dec 27 – Jan 5).

Sounds fun isn't? We still have time to enter. Are you gonna try it?

Tuesday, December 13, 2011

Guest post / How To Decorate Your Front Porch This Winter

Hi there everyone! You must be wondering where I have been... well I am still here and alive! After the procedure on Thursday I am in so much pain and couldn't do anything. Today I finally feel better enough to hit the keyboard to say hi. :)

I have a special guest post today by Jessica, she is from Balsam Hill Christmas Tree Company. Did you know that their trees have been featured on the Today Show, by Rachel Ray, in Parents Magazine, Ladies' Home Journal and have received the Good Housekeeping Seal of Approval? So exciting isn't it? Go on reading to get great decorating tips from a pro!


Winter can be an exciting season. We love the anticipation that swirls in the cool air, much like the snow that dances along sidewalks and streets. We want to make a good first impression every winter, and the front porch is the best place to make one! To help your home shout out "this is me!" the designers at Balsam Hill share their expertise to stir your creative juices and inspire you to create the fabulous front porch that is you this winter.


Character


Just like your wardrobe, home fashion reflects a part your personality. Look in your closet; is it full of heavy fabrics or light, airy dresses? Let this influence the way in which you design your front porch this winter. Your choice of the furnishings and accessories, along with your color scheme, is crucial to successfully showcasing your taste and style. Check out the porch characteristics below with some tips from our experts, and spot which might fit you.


The Safe


Displaying potted plants is always a safe choice for adding color and attention to a porch. Place some camellias in shades of brilliant red and whitish pink and you've got a creative display that beautifully embellishes your home's entry.


Camellias have cold weather varieties, which will withstand the cold weather.


To simplify the rule, design your front porch with any combination of the common essentials, such as a traditional front door evergreen wreath with faux snowflakes, pine cones, and assorted berries, planters, and floral decor. As long as they are not excessive you won't go wrong, because they are all nature-inspired and depict the season.


The Strong


You can go bold, but it ought to be confined to a certain section of the porch and balanced by elements from The Safe section. The season is characterized by the classic maroons and wine-reds, deep blue, chocolate browns, and elegant black. Take away the dullness of your undressed entrance door by painting it a strong contrasting color like blue or reddish-purple, or by simply adding an attractive front door wreath accented with a big red bow.


You might also add winter-colored pillows and quilts on your sofa to put warmth into the area.


The Sagacious


Get a professionally designed and updated look by using unusual or perhaps personalized accessories. Online stores offer exceptional wreaths in unique arrangements in interesting shapes, color combinations, and textures, which are sometimes adorned with a collection of winter accents, berries, and foliage.


You may also craft a stunning winter garland to decorate your porch. Start by twisting together several grapevines and lock the ends with wire. Affix the heads of small artificial camellias or pinecones, and foliage, and coil it around the railings of your space.


Otherwise, you can create an alluring touch with the right choice of amazing lighting options, such as rope lights installed around the borders of your porch. These eye-catching multicolored lights are of low wattage and enclosed in translucent vinyl for safety. They create an element of coziness while showcasing your beautiful displays for the neighborhood to see!


The Functional


How do you use your front porch? Those who use it every day for leisure should focus on the way they use the space, which will influence how they incorporate decor. For instance, if you entertain guests and enjoy a nightcap on the porch, reserve space for extra sitting room. Magazines, home make-over TV shows, home decor stores, and the web are ideal sources of inspiration.


The basic design rule is to provide breathing space on your front porch. This allows you to accentuate the beauty of your design, and to make your entire home more welcoming. If you have limited space, you may focus your design plans on the floor, doorway, corners, and walls. Good taste is timeless, and using just a few elements from this guide can help you to create a beautiful and welcoming front porch. Here's to good first impressions!


Jessica Phan is a designer for Balsamhill.com a purveyor of high-end artificial Christmas Trees. Living in the San Francisco Bay Area is perfect for her because she has a wide range of interests, including Art & Design, Fashion, Photography, Painting and Thrift Store Shopping.

Wednesday, December 7, 2011

Update on Vintage Laura Ashley Dress

Since I am going to get another procedure on Thursday, I am going to take a break from this link party this week. I am not sure how I will be after the procedure, and I don't wanna keep you waiting too long for the link love post.

Today I am going to share the update on my vintage Laura Ashley dress... (you can read about the dress here.


Let me refresh your memory...

Even though I still love the flower print, I didn't care for the really puffy sleeves. It is so outdated, so I took the sleeves off and cut some of it off and put them back on...


The problem with the sleeves wasn't only the shoulders. I didn't like how it was really slim around the wrist. So, I cut it shorter and put in elastic. Now the sleeves are elbow length.


I also didn't care for the neck line. I changed it slightly lower and also made that into a v neck instead of a rounded neck.


Then, I hit a wall. Part of me really wanted to see this dress transformed drastically by cutting the skirt short and making it into a tunic (and, I wanted to make a skirt for Rachel with the extra fabric). Although another part of me still wanted the skirt to be long. It's so hard to make up my mind!


Since then I wore the dress a couple times and I am loving it. I guess I am going to keep it like this for a while... who knows all of a sudden I might decide to cut the skirt short in a couple weeks.

If that happens, I will let you know. :)
Blog Widget by LinkWithin